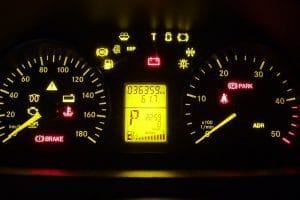
So when you find the engine check light blinking on your car dashboard, don’t panic as It’s a very common issue that most car owners face, there are some easy steps that you can follow to resolve and turn off the check light.

8 Effective methods to turn-off Engine Check Light
#1- Starting car for three consecutive times
In some cases the flashing of engine check light is temporary, it should turn off after a few driving trips or by starting a car for three consecutive times.
The method seems to be very simple but yet it is very effective.
#2- Check the basics
Check for obvious occurring problems:
- Traces of fuel leaks
- Unusual noises, colour, smell, or smoke
- Oil and coolant level and condition
- Corroded connectors & battery terminals
- Vacuum hoses condition that are disconnected or cracked
- Check the air vent system (squirrels and other small animals can build nests or store dog food in them).
Note:
Search for the evidence of previous repairs. Any time-work is performed on a vehicle, there is always a possibility that something may be disturbed, knocked off, or left disconnected while work is carried out on a vehicle.
#3- Checking battery connections and output voltage

Check the battery connection if found corroded, clean it with corrosion removal spray, or you can use a solution of soda and water to clean the battery terminals.
Check the level of acid present in the battery, it should not be below the required level.
Check the output voltage with help of voltmeter, in most preferable situations if your output voltage ranges anywhere between 12.4 to 12.8 that means your battery is in good shape.
#4- Cleaning and resetting the Fuse box (Pulling Off the Fuse and put it back)

The main function of the fuse box is to prevent the electric wiring of a vehicle.
The fuse box gets dirty and slightly loose with time, so you can start by cleaning it and resetting all of your fuses, most importantly while cleaning the fuse check for any short circuit or faulty fuse, you can easily identify a faulty fuse by observing a wire present in the fuse would be broken.
Most of the cars generally have two fuse panels, where one is located in the engine compartment and another is located in the dashboard near the driver knees.
#5- Try tightening your gas cap properly

It is a simple process in which you just have to only check your gas cap, if found loose then tighten it, and if you notice any crack kindly replace with the new one.
#6- Changing spark plugs

- You can start by changing all the spark plugs at the very first time, and then run the engine, if the check light turns off it means that there is a confirmed problem in one of the spark plugs.
- Now remove all the new spark plugs and use the old ones with one new spark plug in each combustion chamber at a time this will exactly tell that in which combustion chamber there is a spark plug fault.
You will have to run the engine after each replacement of the spark plug and see whether the engine check light is still on or not.
In most of the cases the spark plug harness is also found to be faulty along with the spark plug, so if by changing on the spark plugs with the new one the check light is still on you can try to change all the spark plug wire harness and repeat the same process as stated above in case of spark plug replacement.
I know this process can be a little time-consuming so you can take your vehicle to a mechanic and let him identify the faulty spark plug unit.
#7- Check level of oil and coolant

Check the level of oil and coolant in the vehicle, they should not be below the minimum required level, also check its condition.
In most cases due to low oil level, the temperature of the engine increases drastically causing engine warning light to turn on whereas due to low coolant level the temperature of both oil and engine rises, causing oil temperature light to turn on.
Note:
Check the color, smell, and viscosity of the oil. By using a match or lighter, try to light the oil on the dipstick, if the oil flames up, gasoline is present in the oil (which is NOT OK).
#8- Use OBD Scanner (Read a fault code and solve a problem)

When there is a problem in a vehicle (mechanical or electrical) systems, the vehicle computer stores that problem in its memory in a form of unique code known as DTC (Diagnostic Trouble Codes) and turns on the dashboard light.
The OBD scanner is used to extract those DTC (Diagnostic Trouble Codes) from the memory of vehicle systems.
The technician or test engineer simply connects a cable or remote wireless connection to the vehicle computer connector, this connector is generally present under the dash known as DLC (Diagnostic Link Connector) to extract the stored trouble codes.
General steps that needs to be followed during use of OBD scanner:
Step 1: Identify the issue (concern)
Step 2: Perform a visual inspection and basic checks
Step 3: Use an OBD scanner to retrieve the diagnostic trouble codes (DTCs)
Step 4: Check for technical service bulletins (TSBs)
Step 5: Analyze scan tool data
Step 6: Narrow the problem and interpret the potential causes
Step 7: Fix the issue found and determine the root cause
Step 8: Verify the repair and check for any stored DTCs

On-Board Diagnostics (OBD) trouble codes & their meanings
Note:
- Please note that the vehicle acceleration is limited to protect the engine system when DPF indicator blinks or Engine Check Lamp (MIL) illuminates.
- If the OBD system scans the system or component three or more consecutive times or more and no longer detects a problem, the engine check light or any other warning light will automatically turn off.
10 reasons why the engine check light turns on
The points mentioned below are arranged according to the most common factors that lead to this problem-
#1- Loose fuel cap
#2- Spark plug or ignition coil malfunctioning
#3- Bad spark plug wires or harness
#4- Improper voltage supply from battery / Dead battery
#5- Excess load carried
#6- Mass air flow or Knock sensor failure
#7- Oxygen sensor failure
#8- Exhaust gas recirculation valve failure
#9- Vacuum leak
#10- Catalytic converter failure
Let us understand each reason with their average repair cost-
#1- Loose fuel/gas cap

Loose or damaged gas caps are the least expensive yet very common problem that can trigger engine check light.
In most cases just by simply tightening the gas cap will resolve the problem.
- Average repair cost- 5$
- Repair time- 5-10 min
- Process criticality- 2/10
#2- Spark plug OR Ignition Coil malfunctioning

A faulty or malfunctioning spark plug is another most common problem that triggers the engine check light.
The most effective way is to change all the spark plugs after the fault occurs and then run the engine if the check light turns off, which means that there is a confirmed problem in spark plugs. So, then you can check by replacing one spark plug at a time in each combustion chamber.
It is suggested that one should change their spark plug in a timely manner.
- Average repair cost- 50$-150$
- Repair time- 50min-2hour
- Process criticality- 6/10
Possible causes:
- Excess carbon deposit on point of spark generation
- Damaged ignition coil
- Improper setting of spark timing
- Open or short coil driver circuit
- Open your shot in ignition start / run circuit
#3- Bad spark plug wires or harness

When you follow the above process which involves changing all the spark plug but still check light tends to be on, so in that situation, we try to change all high intensity spark plug wires. Once confirmed that there is a malfunction wire then we change one spark plug wire at a time to determine the faulty one.
- Average repair cost- 80$-200$
- Repair time- 60min-3hour
- Process criticality- 7/10
Possible causes:
- Arcing secondary ignition components such as wires, plugs and coils
- Loose wire / connectors
#4- Improper voltage supply from battery / Dead battery

Check the amount of voltage supplied by a car battery, connecting terminals, charging efficiency, battery acid level.
If the reading is 12.45 volts or greater, your battery has a good charge.
- Average repair cost- 100$-300$
- Repair time- 20min-60min
- Process criticality- 4/10
Possible causes:
- Low battery voltage
- Battery terminal Corrosion for incorrect harness connection
- Loose battery connection
- Bulge or crack in the case
#5- Fuse Box malfunctioning

The main job of the fuse is to protect the electrical wiring in case of excess current supply or short circuit.
Most of the cars generally have two fuse panels, where one is located in the engine compartment and another is located in the dashboard near the driver knees.
- Average repair cost- 30$-150$
- Repair time- 20min-60min
- Process criticality- 4/10
Possible causes:
- Blown fuse
- Excess load on circuit due to malfunctioning components
- Loose fuse connection
- Dirty fuse box
- Short circuit
#6- Mass air flow sensor failure

A mass air flow sensor is used to determine the mass flow rate of air entering a combustion chamber.
The information of mass air flow is important to balance the correct mass of fuel to enter the engine, the sensor failure can cause imbalance in fuel supply.
- Average repair cost- 200$-450$
- Repair time- 60min-2hour
- Process criticality- 6/10
Possible causes:
- Knocking sensor circuit short
- Open circuit or low circuit voltage
- Damaged knock sensor
#7- Oxygen sensor failure

A failed O2 sensor is the other most common cause of a flashing check engine light. The most common application is to monitor how much of unburned oxygen is exiting the engine in the exhaust.
The sensor sends the signal back to the engine to adjust the mixture of oxygen and fuel being used. Oxygen sensor failure will result in reduced fuel economy and can cause serious problems to catalytic convertor.
Note:
The oxygen sensor will fluctuate between 0.1volt to 0.9volts, if it is found constantly below 0.5volts then you need to change the sensor.
- Average repair cost- 120$-160$
- Repair time- 20min-60min
- Process criticality- 5/10
Possible causes:
- Damaged heated oxygen sensor
- Exhaust temperature below minimum calibrated value
- Exhaust leak in the exhaust manifold gasket for making gaskets before an year the oxygen sensor
#8- Exhaust Gas Recirculation valve failure

Exhaust gas recirculation is used to recirculate a portion of fuel-rich engine exhaust gas back to the engine combustion cylinders.
It is installed either at the exhaust manifold or at the intake air system.
- Average repair cost- 150$-550$
- Repair time- 2hour-4hour
- Process criticality- 8/10
Possible causes:
- Carbon sludge build up in EGR valve seat area
- Error from mass air flow sensor
- Low or no voltage supply to EGR
- Vacuum leak from EGR valve
- Vacuum signal to manifold absolute pressure be restricted or leaking
- Restriction in EGR flow
- Damaged EGR orifice area or damaged vacuum regulator solenoid
- Damaged DPFE (Differential pressure feedback sensor).
#9- Vacuum leak

If there is a vacuum leak anywhere between the engine and the mass air flow sensor, it will cause “unmetered” air to enter the mixing chamber. This causes the actual air flow to be higher than the mass air flow sensor measures.
Note:
To check the vacuum leak you can use a soap bubble solution in a bucket and spread the bubble over the possible areas of leak, the area of leakage will show a slight motion in bubbles or you can perform a smoke test.
- Average repair cost- 50$-300$
- Repair time- 40min-(depends on the part causing vacuum leak)
- Process criticality- 7/10
Possible causes:
- Damaged or disconnected vacuum hose on (Exhaust gas recirculation) EGR system module
- Leakage from vacuum regulator solenoid
- Gasket leak
- Crack in the vacuum hose
- Stuck open valve
#10- Catalytic converter failure

A catalytic converter is a device which is used to control the exhaust emissions, it reduces the amount of toxic gases and pollutants leaving the exhaust.
It consists of a filter in a shape of a honeycomb through which exhaust gas passes and filters harmful gases like carbon monoxide, hydrocarbons, NOx or nitrogen compounds.
To reduce the amount of toxic gases it performs an oxidation and reduction reaction.
- Average repair cost- 800$-1100$
- Repair time- 2hour-5hour
- Process criticality- 8/10
Possible causes:
- Improper fuel mixture
- Malfunctioning oxygen sensor
- Unburnt for lean fuel mixture entering the exhaust system
- Oil or antifreeze entering the exhaust system
- Malfunctioning spark plugs
Note:
General precautions to be taken if the check light or malfunction indicator light (MIL) blinks or turns on-
– Do not drive at speeds greater than 75 km/hour or 46mile/hour
– If possible then reduce the amount of cargo being towed or carried
– Avoid steep uphill grades
– Avoid sudden/hard acceleration or deceleration
Does OBD (On Board Diagnostics) cost more than actual repair?
OBD generally costs less than actual repair because OBD serves as an early warning system that tells us about current problems that are at the initial stage or at the stage of actual failure.
There might be a chance of catastrophic engine failure or catalytic converter failure, the cost involved in these repairs is way more than OBD inspection at frequent intervals.
Repairs to the engine check light are limited to a low cost if you take an action at the initial stage which can be simple service or replacement of an individual part or assembly.


